
Apple
Support every student
Discover the powerful accessibility features of iPads and Macs, designed to help all learners - including those with additional needs - actively engage, create, and succeed in every classroom.
Speaker 1:
Hi there. Thanks for joining us today. My name is Dale White and I am with the Digital Support Team and I have the privilege today to be joined by...
Speaker 2:
Hi Dale, I'm Joe from Disability Inclusion. Great to be here today. Really excited to jump into some of the accessibility features that are built into our devices and with the iPad. Our teachers are really fortunate now that they've got access to some of these incredible tools that can support all students in the classroom, but can really be personalised for some students with disability that need that little bit of extra support. And it's a great way for teachers to be able to make adjustments as part of that personalised learning support process for some of those students. Some of these features can enable access to the curriculum for students. They can help students communicate with each other and with teachers, and it's a great way for them to be able to demonstrate and show what they can know using some of these tools. So, really powerful and excited to jump into some of these now.
Speaker 1:
Mate, we've got a great little versatile tool here in front of us here and it's in a lot of classrooms that we have right across the state as well. But let's jump in and have a little bit of a surface look at some of where the power lies. In this particular case, let's jump into settings. Now, a couple little things for us to consider when we are exploring the settings is that different schools may have a different management system of their iPad devices. So you might need to go and talk to your computer coordinator around how you might need to adjust anything in here for any of your students you may have in the classroom. In that management tool, something like Jamf Pro, that might be able to have a quick little adjustment in there so you have access to some of all these powerful tools here.
Let's jump in and have a bit of an explore. So I'm in the general section at the moment because I want to draw everyone's attention to one little part in here first very quickly. If I navigate down here to the Keyboard, when I click on Keyboard, there's a couple little tools in here I want to be able to draw your attention to. Text replacement, great for students with these really long names, shrink them down, have a short abbreviation when they type in those letters. The rest of it pops up nice and simple. I love the fact that I can scroll down a little bit further down here and I can turn on Dictation. Now Dictation great feature. I can use my voice and it puts my voice into words on the screen. So great little space for us to be able to explore, turn a couple of these things on, help our students out as best as we can.
But I will jump back into settings again. I'm going to click on Accessibility because Joe, this is where the power is. This is what makes this tool an amazing little tool for us to use. It's been, I guess, segmented into different areas for different supports for different particular students. Firstly, we've got vision and we're going to unpack VoiceOver today and show you that, but it's got some great zooming tools, some great ability there to read your screen, adjust the look and feel of the screen. Let's dive down into the physical tools that it has. Fantastic here. I love head tracking as well. Builds in nicely there. Voice Control, that's another great little tool as well. If I explore down in Hearing spaces, I love the fact that I can just use Name recognition so I can see different things that happen or hear them pop up when they get heard, they pop up on my screen nice and easy for us as well so I can get a visual of things that are happening around me there.
Speaker 2:
Captioning, sorry Dale, it's come a long way too for the students and another one that's great for all students in the classroom, particularly important for our students who are deaf or hard of hearing.
Speaker 1:
Great call out there, Joe. Live captions, explore that one. But right down at the bottom here, one that you want to make sure that you do understand and are aware of is the Accessibility shortcut because that makes I guess finding these particular tools so much easier for you. So understanding that a triple click on your device will be able to activate that Accessibility shortcut, make sure you know about that one. Now let's unpack some of these Joe very, very quickly before we dive in. So the first one we're going to have a look at today will be VoiceOver. Great little screen reading tool that we have access to. It will read everything on the screen, which makes our lives so much easier. Now when I turn it on, it's going to start reading straight away. So it will automatically pick up and I'll stop talking while I just quickly turn it on because I can't talk over the top of some of these things.
Speaker 3:
VoiceOver on, settings, search, search field. Using on device intelligence, your iPad can detect people. VoiceOver off.
Speaker 1:
Now you will see every time I was tapped somewhere on the screen there, Joe, what it was doing is it was reading back to the user exactly what you could hear. Now to action things on the screen, I had to double tap to be able to action things, but one of the things I'd love to call out in this space is that VoiceOver tutorial. I think quickly doing that voiceover tutorial gives you great understanding of how powerful this tool can be and the gestures that you're going to be required to be able to use it.
Speaker 2:
That's right Dale, I think it's really important. Obviously it's an incredible tool for our students who are blind or low vision because there's no other way to really be able to access some of those parts of the iPad and be able to access their learning in the classroom. Really powerful. And voiceover gets better and better with every software update. There's some incredible features in voiceover now that can really personalise it for that student's needs.
Speaker 1:
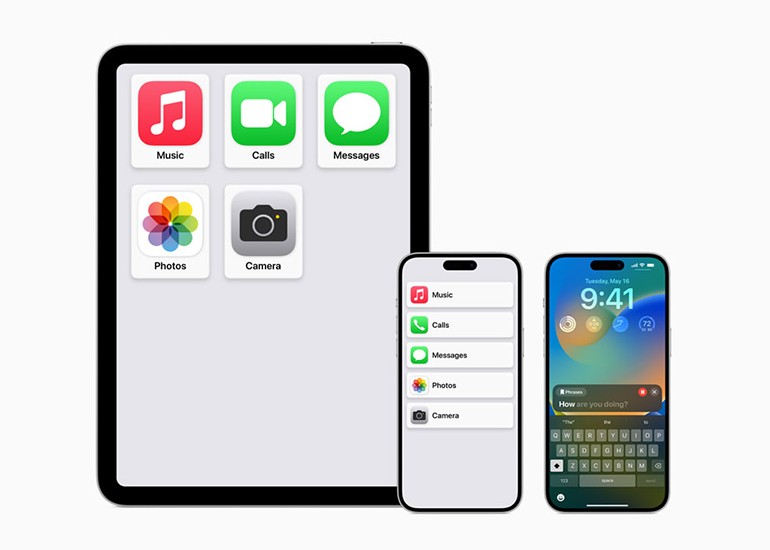
It does. There's, as I said, so many great tools on here, certainly worth exploring, but let's have a look at one more that I want to have a quick look at today, Live Speech. For those students who need a little bit more verbal support for a variety of different reasons you've got out there. Let's quickly jump in and be able to access this particular tool. Now I've already turned this one on because I want to show you that accessibility shortcut. So again, I'm just going to triple click the home button on my device and it's going to quickly bring me up with some of my most recently used phrases here. So you can see here, if I tap on any of these phrases, it's going to tell me. It's going to speak to me, which is going to be nice and easy.
Speaker 3:
What's for lunch, Joe?
Speaker 1:
Love it. Now there's going to find you're going to be using things pretty often. So you want to categorise different things and get, I guess a bit of order and structure in here, but it could be as simple as having something as yes and no to be able to help the teacher as well. But I love the Saved section. If I tap on Saved, I also have the ability to have some preset phrases. Now by tapping on phrases down the bottom here, I can enter in new phrases, nice and simple that can be, I guess my most commonly used things all the time. So I don't have to type them in all the time. For example, simple one could be, could you please explain the instructions again? I tap on that, it reads it straight back off the screen for me. Nice and simple. Now there might be something here that's not I guess as common, but if I tap on phrases, I actually toggle across to the keyboard and this is where I can specifically type in the message that I want to be able to get back to the person who's asked me that question as well.
So how could you use this type of thing in the classroom, Joe?
Speaker 2:
Yeah, this is another really powerful tool for our students who might need that additional support with their speech or communication. A lot of our students may use other really expensive technology that's out there, other devices, but to have something built into your iPad like this is a quick, easy way for them to be able to communicate their needs and wants and a really powerful tool to use in the classroom with your students and really help them to access their learning.
Speaker 1:
Yeah. Great call out there. And we know there's a range of different, I guess, tools that are available on this iPad and we've got a range of resources available for people as well. So I'll quickly navigate to exactly where they are so you can find them in the future if you want to be able to explore this space even further. If we come back to our Department of Education website here, if we come up to the Teaching and Learning section and we click onto here, we head down to our Technology for Learning options here. Plenty of great resources in here from a raft of different reasons, but today let's jump into Resources. Let's navigate down to Professional Learning Resources. Now as we explore down, you're going to start to see some of the resources available for different digital tools that you have available, but the one we want, Inclusive and Assistive Technology.
If I jump into here, let's jump into Apple and have a bit of a look at what we've got. And I've got videos in here available for our teachers and our students to be able to access some of the very simple tools, but very powerful tools that we have on our iPad as well. So certainly worth checking them out. But also if you navigate right down to the bottom, I have some great links that link you out to some great resources from Apple that will help you be able to dive in a little bit deeper if you wanted to explore things even more.
Speaker 2:
Yeah, it's great Dale. Some incredible features built into right at your fingertips with an iPad and it's really about jumping in, trying things out with your students, finding out what's going to work best for them and just really giving it a go. So yeah, thank you so much for joining us today and really encourage you to jump in and test out some of these tools for yourself.
iPad accessibility features
iPad accessibility features support personalised learning, curriculum access, communication, and knowledge demonstration for all students.
Speaker 1:
Hi there. Thanks for joining us today. My name is Dale White, and I'm from the Digital Support Team. Today I am joined by...
Speaker 2:
My name is Joe. I'm from the Disability Inclusion Team. Great to be here, Dale. Really excited to jump into the Mac and some of the accessibility settings on these devices. There's some amazing features that can actually support all students in the classroom, but can really be personalised for some students with disability.
Speaker 1:
Yep.
Speaker 2:
And some of those things help students access the curriculum, they can help students to communicate with each other and the teachers in the class, and also to really demonstrate their understanding, show what they can do. So excited to jump in a couple of those.
Speaker 1:
And there's so many things built into this device that are, I guess, in the Apple ecosystem, which is designed for personalisation, isn't it? So let's jump in and have a bit of an explore today. I guess when we are working in this space, a couple of considerations to be aware of. We are coming today from the operating system of Tahoe 26.5.2. So just sort of be aware of that, where we're joining you from, but we want to head over to the settings. Now there's a couple of ways to get to settings. If we jump up here to the Apple in our top left-hand corner, if I click on that, you're going to find the system settings there. Nice and easy to be able to get to. We've got a range of different settings available to us on our devices, but let's keep it nice and simple today.
Let's jump into accessibility because you're going to see in here so many different things for so many different needs that we know our students have in our classroom. So it could be some students who need some vision supports around how the things are displayed on the screen, how voiceover takes place, how you can zoom and adjust the text size. So many great things there that can really help our students from a hearing perspective.
We will talk a little bit about, I guess, live captions today, but so many great things to explore with Name recognition too. Having it appear, things appear on the screen when there's sounds happening around you is a great feature to know some of our students will really thrive upon. We know our Macs are built around our ability to be able to support students who have motor needs. We'll show you a little bit around Switch control today, but something as simple as the pointer that I've got on, I guess, on my device here, nice big green pointer so I can easily see where it is and also be able to adjust different things for so many different students as well. But Voice control.
Speaker 2:
Love the Voice control. A great way to be able to open things just using your voice, be able to type, access things on your device really easily.
Speaker 1:
And we know a lot of our students time to time can injure themselves playing all sorts of different sports. Great tool for that as well.
Speaker 2:
Yep.
Speaker 1:
We've got plenty of speech things we've got down here as well. So explore the needs that you're going to be able to use in your classroom each and every day for your students. But Joe, I though we'd explore a couple of things first today. Just a quick little shallow dive into a couple of them, Live captions. So let's jump into that one and have a bit of a look. So I've just clicked on Live captions.
As I navigate up the top here, lots of different features that I can adjust and play with. So you might have some students with some visual needs that you need to be able to think about in your classroom, change the background colour, the font size, the colour of it. I won't. For this example, I'll just leave it as default. But to switch it on, I'm going to jump up the top here and click on Live captions. Now it will take a second or so to be able to jump in and load. So this is probably a great time for me to be able to explore, I guess, some adjustments that I need to do. And you can see big grey boxes appeared on the bottom of the screen, but also in particular, a little menu setting options appears up here as well. So I'm going to jump up the top here on the right and just switch it over to my microphone because I wanted to access my microphone on the device nice and easy.
Now that the microphone is being accessed, you can see here it's going to have everything that I say appear up on my device. Great little tool for students to be able to hear what the teacher is saying, but also great for the teacher, if they've got this up on the board in their classroom, that they can have it in a space where kids can see it, but the students can quick and easily be able to follow along as well.
Speaker 2:
What I love, Dale, about this tool as well, if you jump into the settings, if you switch over to the computer audio, if a teacher is showing a video to the class, this will automatically caption that video live for them as well. So you're not relying on that video to be captioned. You've got it there built in, ready to go.
Speaker 1:
Perfect. Perfect. Nice and simple and easy. It's already built in here with Live captions. That's great. All right, let's jump off Live captions and let's go and explore another particular tool that we have in our accessibility functions as well. But let's have a look at Switch control, Joe. Can you tell us a little bit about what's a switch?
Speaker 2:
Yes. Switch control, really powerful tools built into Macs. So this is for students usually with a significant physical disability that needs support to be able to interact with their device. So you might see different adaptive switches like the big red buttons. It could be a joystick. It could be an external keyboard. Sometimes students might be in a wheelchair and can access the buttons by pushing their head or whatever it is, but it's a way for them to, when they push those buttons, it helps them navigate their device. It'll help them move around the screen, be able to access what they need to, and really helps with their independence with their learning. Yeah.
Speaker 1:
Yeah. So they can still be part of the classroom, still joining like everyone else.
Speaker 2:
Yep.
Speaker 1:
And we don't have an external switch with us here today, but I love the fact that I can use a couple of keys on my keyboard that are on the device, which makes it nice and simple for me to be able to use that as well. So I have set this up. If I turn my switch on in a moment, there's a couple of features I want to point out that I have set up in advance. So I've hit the little plus button down here, and I've added another little button here, which is the right directional arrow on my keyboard here. And that allows me to move to next item. The space bar, nice and large in the centre of my keyboard here, can't miss it. That's going to be the one that allows me to select the item, which is pretty simple.
So if I turn on switch control, you're going to see a little black box appear here. Now, this is the home section. If I hit that right arrow on my keyboard, it's going to navigate across everything that's on, I guess, that little home switch, is nice and simple to navigate around. If I stop at the dock because I want to explore the dock, I quickly tap on that one with my space bar. And again, I'm just selecting the right arrow and it's identifying different tools on my dock that I can access another programme. Very simple, very easy to use. And you can go in really deep here, but let's keep it nice and simple today.
Speaker 2:
You really personalise it for the student. You might be able to scan around the screen in different ways.
Speaker 1:
Yeah.
Speaker 2:
Whatever's going to support them to access their device.
Speaker 1:
So certainly worth checking out these different features up here in the home options here to see how they can support your students each and every day. So now what we might do, Joe, is have a little bit of a look at where we can find some other resources that are available to us because there's so many cool things that we can do here on this Mac. So I've just jumped over to our Department of Education website here. If I jump up to the Teaching and Learning section, navigate down to Technology for Learning, I can dive down into our T4L website. If I head down over here to the resources that are available to all of our staff, head down here to our Professional Learning Resources. We've got a range of different spaces that we can have lots of resources for, but the one we want to look for is Inclusive and Assistive Technology.
So many great ways for us to be able to personalise that learning for our students in our classroom. So dive on down, explore the different options that we've got, but today we're going to look at Apple because we're going to explore what's available to us for a Mac. Now dive in here, you're going to see some other, I guess, some tools available on an iPad. But as you navigate down, you're going to start to see some Mac tools as well. But further down the bottom of the screen, if you're looking for some more information, dive into some of these great little tools here, some great links out to our Apple Learning Centre to be able to get, I guess, some more information around how we can support our students each and every day.
Speaker 2:
Yeah. Thanks, Dale. So many amazing features there. Really encourage teachers to jump in, try out some of these tools with their students, see what's going to be personalised for them. And you might find that it benefits all students in the classroom. So give those a go and really encourage teachers to check out the resources and see what you can use tomorrow in your classroom.
Mac accessibility features
Explore Mac accessibility features supporting personalised learning, communication, curriculum access, and student understanding demonstration.
iPad
Apple iPad - Reader View and Hide Distracting Items
Simplify web pages and focus on the content, making online reading easier and distraction-free.
Apple iPad - Guided Access and Background Sounds
Create a calm environment and stay focused by limiting device and external distractions and managing app features and usage.
Apple iPad - Dictation
Simply use your voice to dictate your text on an iPad.
Apple iPad - Spoken Content
Explore using text to speech feature on your iPad.
- Set up and turn on Switch Control on iPad (requires a switch connected)
- Use AssistiveTouch on iPad
- Use Voice Control to interact with iPad
- Use your voice to ask Siri to help you (various on devices)
Apple iPad - Reader View and Hide Distracting Items
Simplify web pages and focus on the content, making online reading easier and distraction-free.
Apple iPad - Dictation
Simply use your voice to dictate your text on an iPad.
Apple iPad - Spoken Content
Explore using text to speech feature on your iPad.
- Magnify and examine objects around you with iPad (requires the app)
- Zoom in on the iPad screen
- Hover over text to enlarge it on iPad
- Have your iPad read the text on aloud
- Make iPad text easier to read with accessibility features
- Stop or reduce onscreen motion on iPad
- VoiceOver - a gesture-based screen reader on iPad
- Change colour on iPad to make it easier to see items onscreen
Mac
Apple Mac - Spoken Content
Use your voice to dictate your text on a Mac.
Apple Mac - Spoken Content
Use your voice to dictate your text on a Mac.
- Vision on Mac
- Change Zoom settings for accessibility on Mac
- Use Hover Text on Mac
- Have your Mac speak text that’s on the screen
- Change Display settings for accessibility on Mac
- Stop or reduce the movement of some screen elements
- VoiceOver user guide on Mac
- Use braille displays with VoiceOver on Mac
- Change display colours on Mac to make it easier to see what’s onscreen
Please note: These support links align with the current DoE student iPad configuration set up by schools utilising Jamf Pro. More inclusive and assistive supports are available for students and staff with BYOD devices. Visit the Apple Accessibility Page to explore additional supports available for the device.
Last modified date
23/10/2026
Business unit contact email
Executive director
Charlie Sukkar, Freya Elliott, Monica Strong
Executive director’s business unit
Operations Group